Planning feels easier when you can see the next step. Use this guide as a practical reference, then adapt it to your event, your guests, and your budget.
Build your checklist around decisions, not chores
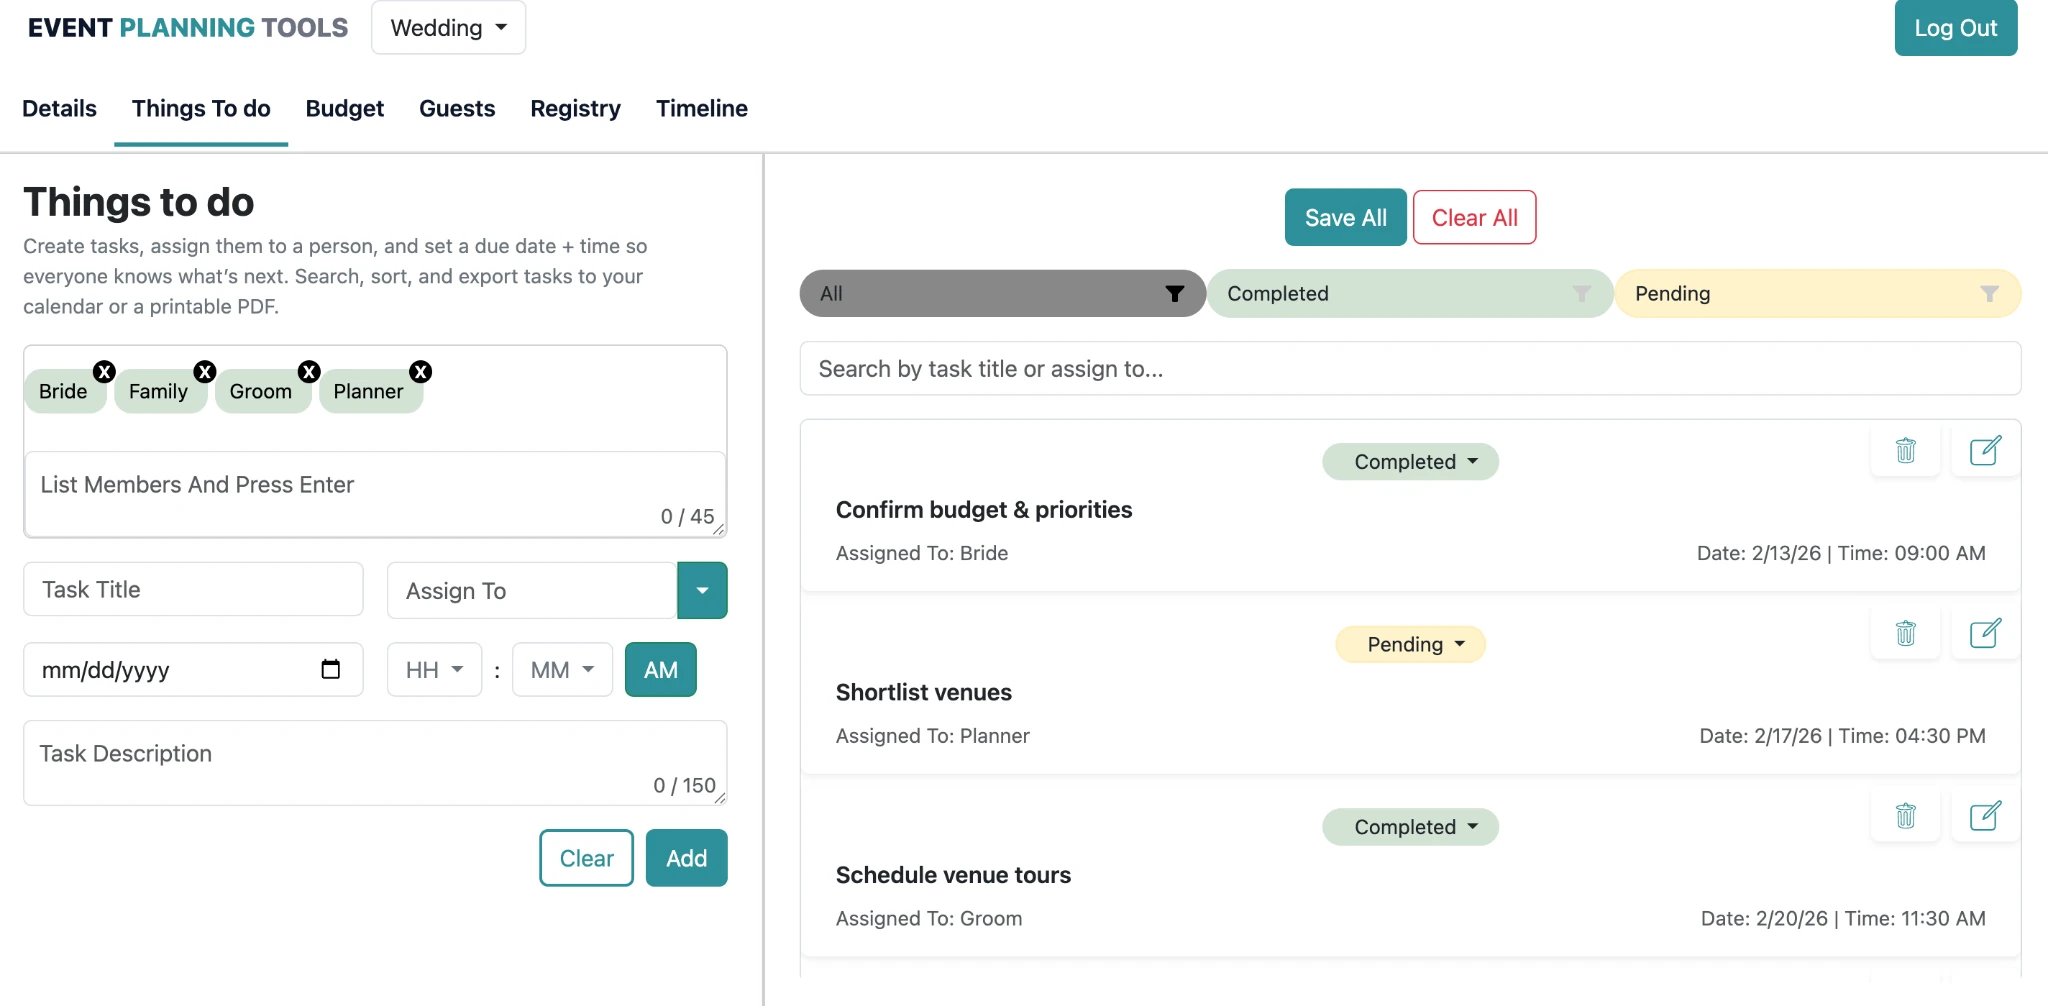
A great checklist is built around decisions that move the plan forward. Instead of writing dozens of tiny tasks, group your work into meaningful steps: choose your venue, confirm your core vendors, set your guest plan, finalize your ceremony details, and plan your reception flow. Each step can include a few supporting tasks, but the checklist should point you toward what matters.
When you use the planner, start by adding the biggest decisions first. Then add the supporting tasks that must happen before each decision. This keeps your list short and it makes progress visible.
Practical step: write one clear action you can complete in the next seven days. Then add it to your checklist with a realistic time block. When you finish that one action, planning feels lighter and you can build the next step from real progress.
Use clear owners and deadlines to reduce mental load
A checklist fails when everything is assigned to both people and to no one at the same time. For each item, choose an owner. If it is a shared decision, still pick the person who will drive it forward by collecting quotes, setting a time to decide, or messaging the vendor. That one choice prevents most planning friction.
Add due dates that match reality. A deadline is not a wish. It is a date that gives you time to research and make a decision without pressure. When you set realistic due dates, you will avoid last minute rush fees and stressful weekends.
Common mistake: trying to decide everything at once. Instead, decide what matters most, confirm that first, and let smaller details follow. If a choice changes your budget or timing, capture it in the planner so you do not rely on memory later.
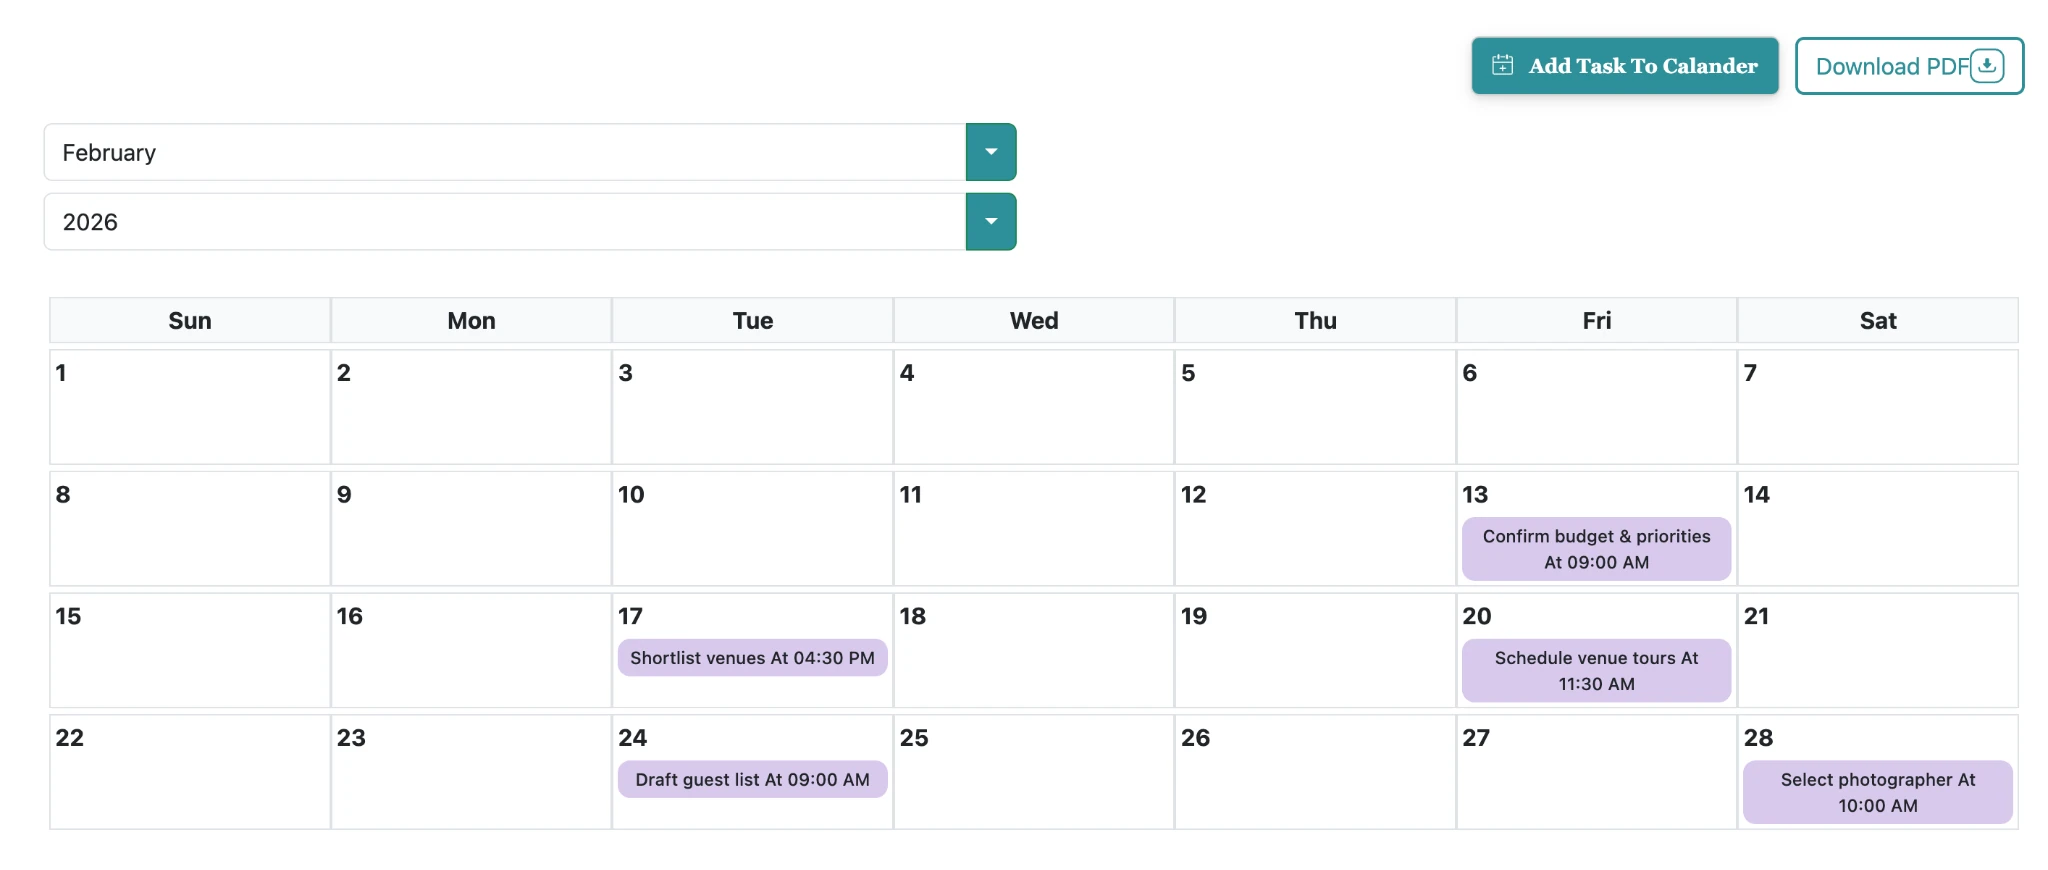
Plan in phases and review the next two weeks only
Wedding planning feels overwhelming when you look at the entire year at once. Instead, plan in phases. Early phase tasks include venue, guest framework, and core vendors. Middle phase tasks include attire, rentals, and design details. Final phase tasks include seating, final numbers, and day of logistics.
In your weekly review, focus on the next two weeks. Ask a simple question: what must be done before our next decision. That keeps the plan moving without turning every week into a sprint.
Decision approach: compare options using the same assumptions. List what is included, what you must add, and what could change the total cost. This keeps decisions fair and prevents surprises when you move from estimates to real bookings.
Make a short list for meetings and vendor calls
Vendor calls become more productive when you prepare a short list of questions. Add a checklist item for each vendor and include notes right in the planner. Questions can cover pricing, timing, what is included, and how changes are handled. A few careful questions early can prevent big issues later.
After the call, capture the key details in the same place. This prevents the common problem where details live in text messages, email threads, and memory. You want a single place where your plan lives.
Guest friendly check: imagine a guest arriving for the first time. Can they find parking, know where to go, and feel comfortable right away. If any step feels unclear, add one sentence of guidance to your plan and share it with helpers.
Keep your guest work organized from day one
Guest planning has a lot of moving parts: addresses, plus ones, children, meal preferences, and seating needs. Add guest work to your checklist early. Collect addresses and confirm how invitations will be sent. Then set a clear deadline for RSVPs that gives you time to follow up politely.
When you keep guest work organized, you protect your budget and your timeline. Your caterer and venue need final numbers on specific dates. Your checklist should support those deadlines.
Momentum tip: finish the small, boring tasks early. Addresses, vendor contacts, and supply lists are not exciting, but they prevent stress later. When those basics are done, you can enjoy the creative parts of planning without last minute pressure.
Add a simple risk list to avoid surprises
Most wedding stress comes from surprises. Create a short risk list with a few items: weather plan, vendor backup contacts, buffer time in the timeline, and a clear plan for payments. Each risk can become one or two checklist items. This is not about fear. It is about being prepared so you can relax.
For example, add an item to confirm what happens if the ceremony moves indoors, or to confirm vendor arrival times with your venue. These small confirmations make the day smoother.
Practical step: write one clear action you can complete in the next seven days. Then add it to your checklist with a realistic time block. When you finish that one action, planning feels lighter and you can build the next step from real progress.
Turn your checklist into a day of plan
As you get closer to the wedding, your checklist should shift from decisions to execution. Add items that confirm details: final payments, final headcount, seating assignments, and deliveries. Then create a final week list that is short and practical.
If you are using a coordinator, share your checklist highlights so they can spot gaps. If you are not using a coordinator, assign a trusted helper for key tasks like keeping water available, collecting cards, or communicating with vendors.
Common mistake: trying to decide everything at once. Instead, decide what matters most, confirm that first, and let smaller details follow. If a choice changes your budget or timing, capture it in the planner so you do not rely on memory later.
Next steps inside the planner
After your checklist is in place, connect it to your Budget tab so every vendor decision has a cost attached. Then move to the Timeline tab and map the flow of your day. When your checklist, budget, and timeline agree, planning feels much simpler.
A calm wedding plan is not perfect. It is clear, current, and reviewed often enough to stay true.
Decision approach: compare options using the same assumptions. List what is included, what you must add, and what could change the total cost. This keeps decisions fair and prevents surprises when you move from estimates to real bookings.
Related wedding planning guides
Keep your plan connected. These guides work together (checklist → budget → timeline → guests).
FAQs
Real questions people search while planning. Use these answers to make decisions faster.
What should be on a wedding planning checklist?
When should I start wedding planning?
What are the first wedding checklist items to do?
How do I keep a wedding checklist from feeling overwhelming?
How many tasks should I have per month?
What if we change our wedding date?
Do I need a wedding planner to use a checklist?
How do I track wedding tasks with family helping?
Next steps
Pick one action you can complete today. Small progress makes planning feel lighter.